2009
Aerogarden Progress: Everything is going except parsley, but that takes the longest.

Any Given Sunday is a great “background” movie.
Updated email encryption certificate 1 day before it expired.
dd commands that run for 2+ hours could really use a –verbose flag
AirTunes Bug in Apple TV 2.3
I was doing some work on my Apple TV’s today, swapping out hard drives, and at the same time we’ve had some painting going on so my 802.11n network has been offline. I got done upgrading the Apple TV and plugged it into ethernet to do an initial sync. Afterwards I put it upstairs where it normally sits on an 802.11n wireless network, but today it’s not connected to anything. That was fine since I wanted to test playing local content.
Mazie wanted to watch a quick show so I fired that up and it worked great, no issues. I decided then to play some music and hit a wall. The Apple TV refused to play any music or audiobooks. At first I thought it was something with FairPlay, even though that made no sense, but I couldn’t even play MP3 files I had ripped off of my own CD’s. Something was amiss.
It hit me then that this Apple TV typically connects to the AirTunes destination for the Living Room, and that with no network connection it wouldn’t be able to see that. Bug! I tested it out and verified that this is indeed a bug in Apple TV 2.3.

If you have your Apple TV set to play through an AirTunes destination, and you then take the Apple TV off of all networks, it will fail on playback of content that it would typically send to AirTunes (video will work fine since that never goes to AirTunes). Now, what really kills about this bug is that since there is no network the menus have no options to deselect an AirTunes destination. It seemed the only way to get rid of this issue would have been to do a reset, or get it back on a network and deselect the remote speaker destination. Ugly.
I chose to just get it online and deselect the speaker set. Resetting settings would cause me to have to change other things as well. I filed a bug report with Apple, #6484963. Hopefully they will clean this up. It’s not a likely scenario, but I could see it happening particularly if you took an Apple TV to a cabin for the weekend and then wanted to listen to music without a network connection.
Midway through upgrading one of my Apple TV’s from 40G to 250G. Easy so far.
The dd steps on Apple TV hard drive upgrades take a long time.
Finished tearing up bedroom getting ready for painters to arrive. Just started the ball rolling on two hardwood floor installations. Bedroom painting did not finish today. Tammy and I are on the hide-a-bed tonight. Oi!
Tetris Tiles ← Very cool tiles to do Tetris inspired layouts in your home!
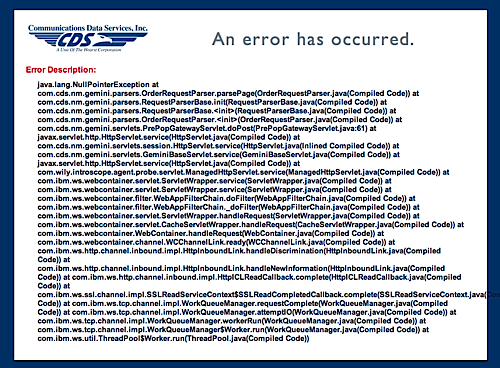
Tried to sign up for a trial subscription to JPG Magazine today. I don’t think this was the result I should have gotten. The error, and stack trace, is courtesy of CDS Global.
Stacks of art.

The Kiln room at Northern Clay Center. This is one of the 4 gas kilns, on the other side of several electric kilns.
All your pieces are fired to 2,350 °F.

Keep Track of DRM Protected Content in iTunes
I mentioned in my post on DRM being removed from iTunes that I track DRM content using a Smart Playlist. I’m fine with some DRM content, but I like to keep a handle on what is DRM-protected. iTunes makes this easy, just create a Smart Playlist like this.
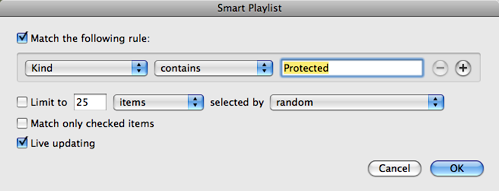
DRM protected tracks have the word “Protected” in their Kind description, so this will let you easily keep tabs on what content you have this is DRM restricted.
This can be a really useful playlist to subtract DRM protected content out of other playlists using this. For example, if you wanted all content added in the last 6 months, that is not DRM protected do this.
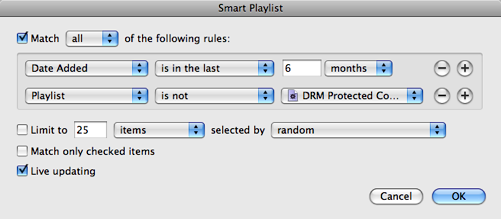
This is particularly useful if you are trying to sync content to a device that will not play FairPlay protected tracks.
All of iTunes now DRM Free
The announcement today that all music in the iTunes store was going iTunes Plus and removing the DRM protection was one that I was expecting and looking forward to. I don’t mean that I was following recent rumors about DRM being removed, but rather that I’ve expected that DRM will be removed from music for over a year. It’s just a matter of time. I’m happy to mark this milestone on my calendar.
I came home and fired up iTunes. It found 49 albums plus some odds and ends to upgrade. I track DRM in my library with a smart playlist. It says I have around 1,800 items (including movies and TV shows) that have DRM. 728 songs takes a huge chunk out of the music and the rest will follow in coming weeks.
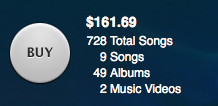
I’ve never had iTunes download 700+ items in one shot. It seems it can only do 250 at a time, so this will be busy downloading for a while.

I can happily say goodbye to music-related DRM now. We still have DRM for movies and TV shows, we’ll see where that road leads.
Had the first of my personal training sessions today. Starting a 3 month training program (3x week) today.
Heading to spin class (early!) to make sure I get a bike!
Called to cancel DirecTV and they saved me (for now) with a better rate that nullifies some of the cost savings I would get by dumping it.
MobileMe Needs Time Machine
I’m frustrated with MobileMe synchronizing again. I have no idea what happened but around 10:00 am this morning my Address Book has a duplicate everything. All the groups are duplicated, and every contact is duplicated. They are identical, with one exception, the pictures. So now I have 2x the real number of entries and they are all whacky. These are all rolled down to my iPhone already too.
Now, I can get back to healthy pretty easy with Time Machine and I’ve also started doing a weekly archive of my Address Book “just in case”, but I thought syncing for MobileMe was supposed to be improved in 10.5.6?


This made me think, Apple needs to implement Time Machine on MobileMe. I should be able to just login to MobileMe and go back to a few hours and make it all better! MobileMe and Time Machine would be like chocolate and peanut butter. Makes total sense.
How to Remove Your
I’ve become more of a fan of Facebook over recent months (see my profile). They have made a number of improvements that I really like, and the number of people joining the service seems to just increase more and more over time. I’m really amazed at home many people you can find on it. I think they are well on their way to being the de facto White Pages of the Internet.
With that said, I don’t like the Wall feature of Facebook at all. For whatever reason, I’m just not real hip on anybody coming to my profile and just typing away. I’ve turned my wall off for a long time, and enough people have commented to me “Hey, you don’t have a wall! How did you do that?” that I thought I would share how to remove your wall.
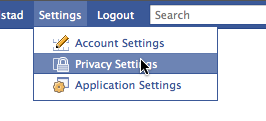
Now, to be clear, we are not removing the wall per se. Facebook will not allow you to remove the Wall application. Instead, we are going to adjust privacy settings to hide the wall entirely. First, go to your privacy settings.
Now click on your profile.
In this screen, scroll down a ways and you will find the “Wall Posts"section. Simply change your settings to look like this. Uncheck the “Friends may post to my Wall” box and change the privacy option.

You could set this so that only you can write on your wall if you want. There are a couple of different options. I have it set like above which effectively removes the wall.
Jan. 8, 2009: I’ve gotten some questions from people saying this doesn’t work. I think the challenge is catching the result. I’m adding this section to help illustrate what this does.
Result
Now that you have made this change you probably want to check to make sure it worked. This is a little hard on Facebook since it’s not terribly easy for you to see your profile as someone else. Facebook does have a feature that allows you to test this out, in your Profile Privacy settings, where you changed your wall privacy options, you can type the name of a friend and see your profile as they would see it. This works great for testing, particularly if you are using Facebook groups to assign privacy levels differently for various people.

You may be confused that even after these changes your profile will still have a tab called “Wall”. That is impossible to remove, per my earlier comment that we cannot really remove the Wall. It’s integral to the functioning of Facebook. All we did was remove the ability for people to write stuff on it.
Before these changes this is how a friend would see your wall.
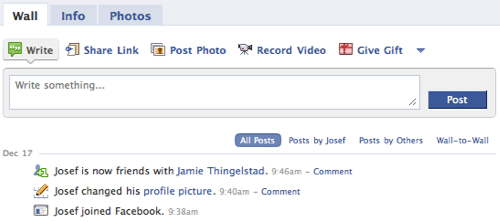
Note the option to Write on the wall. After making these changes a friend sees your wall like this.

The option of writing on your wall is gone now.
Stating the obvious.
Please, no calls or texts during the movie. — AMC Theatres
